
Last updated Feb 22, 2024
With Teamup, a shared editorial calendar makes creating content and working collaboratively more efficient for businesses, organizations, and publications.
Content is more than a block of text; most of the content we produce, both long and short, involves multiple forms of media. Writers, graphic designers, illustrators, video producers, photographers, editors, and others work together on various aspects of one piece of content.
With Teamup, creating content is easier for everyone; Teamup Calendars are flexible, accessible, and can be organized in a customized way. A shared editorial calendar gives a big-picture view to editors and content managers and helps with day-to-day task assignment for all team members. Features like access permissions, event comments, and custom event fields make collaborative planning and workflow tracking easy.
In this post, we’ll show you how to do the following:
- Organize content and contributors
- Use editorial workflows
- Track workflow status
- Enable team discussion and notes
- Collaborate easily with guest contributors
- Add holidays, industry news, and more
- Give customized access to your content team
- Plan and schedule content
- Assign tasks and deadlines
Setting up an editorial calendar with Teamup
There are many ways to set up an editorial calendar. We’ll walk throcugh one possibility, showing how the features and customization options in a Teamup Calendar could work for your editorial needs.
Organize content and contributors with sub-calendars
After creating your Teamup master calendar, create a sub-calendar for each type of content you create. (Haven’t created a Teamup Calendar? Click here to create one now.)
If you produce many types of content, you can organize the content sub-calendars into folders.
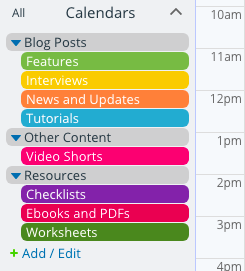
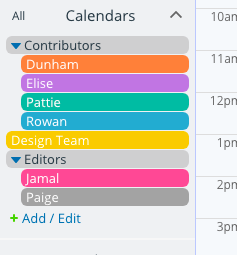
Create a sub-calendar for each contributor, as well, or for the various teams involved in content production. For example, you could create a sub-calendar for the Design Team, or you could create a separate sub-calendar for each member of the Design Team.
Use an editorial workflow with custom event fields
Next, go to Settings > Event Fields to create new custom event fields to track progress through the content workflow.
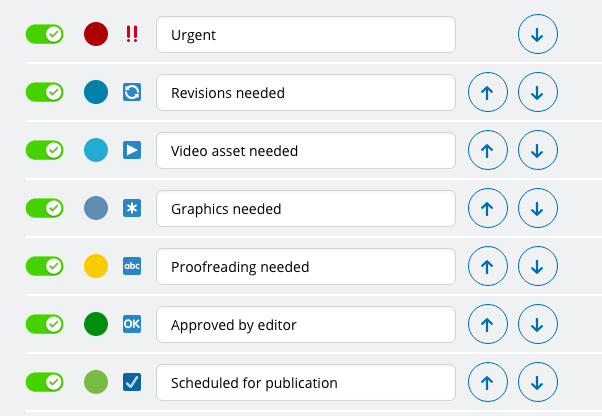
We’ll create a custom event field with choices, and set it to multiple choice.
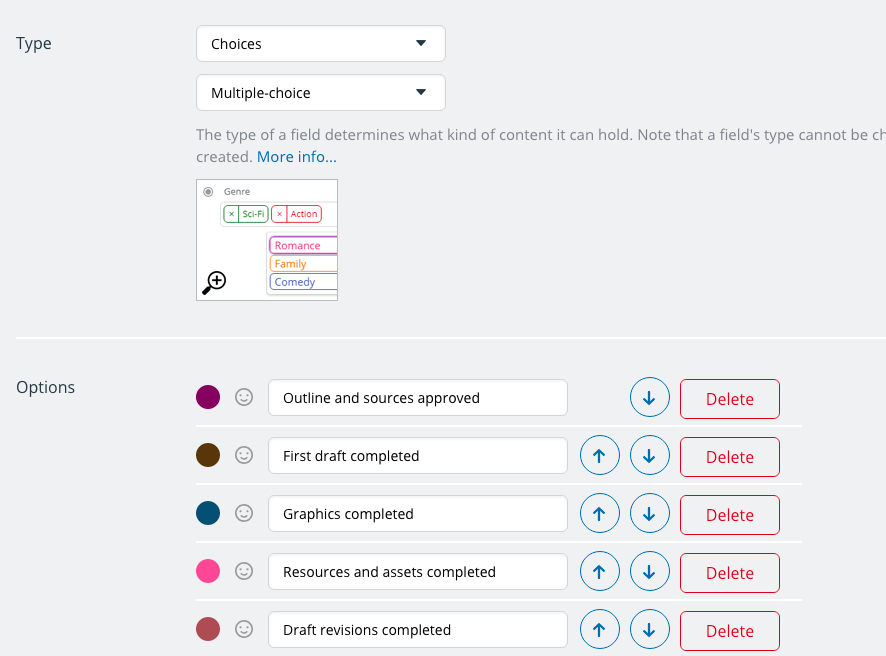
Now, as each team member completes their part of the content workflow, they can add the relevant option to the event field.
You can also set emojis for each option of an event field:
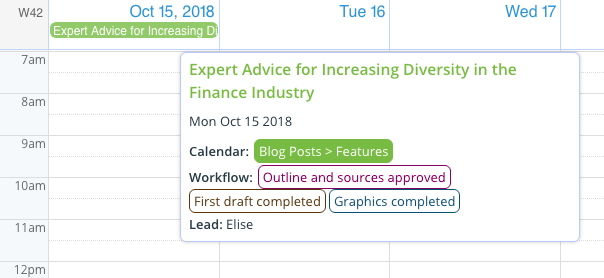
Track workflow changes by showing custom event fields in the event title
We’ve set the event field contents to show on event titles, so the selected options from the event field show up in the calendar view. You can choose to have the name show in the event title:

Or you can have the emoji show in the event title:
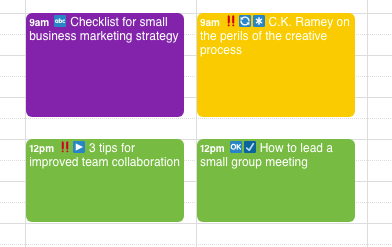
Using emojis can help to create a quick visual reference without cluttering your calendar with long event titles.
You can create other custom event fields, as well. The number of custom event fields you can create depends on your pricing tier: see more information here.
Here are some other ways you could use custom event fields on an editorial calendar:
- Assign work to an individual: if you’ve chosen to create a sub-calendar for a team rather than for each team member, you could use custom event fields to assign work to an individual.
- Set deadlines for various stages of the workflow: you could use a single-line text event field to put in a deadline for each workflow stage, then update the deadline as each step is completed.
- Capture relevant information: input guest contributor information, times and dates for interviews, credit for photographers or other assets, and more.
- Ensure certain tasks are completed: create a custom event field with various steps that must be completed, such as SEO-related steps or social media scheduling.
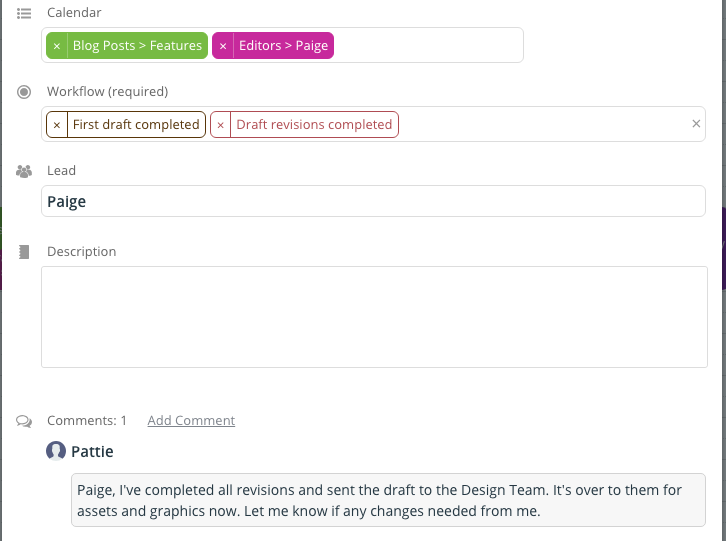
Enable team discussion and notes with event comments
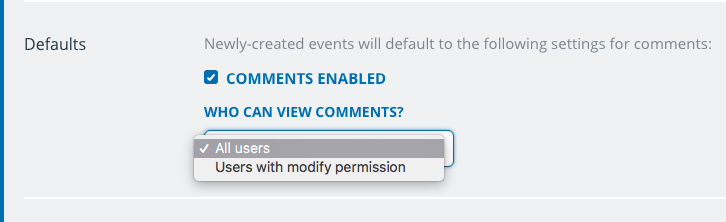
You can set event comments to be enabled, by default, for every new calendar event by going to Settings > Event Fields, then editing the Comments field.
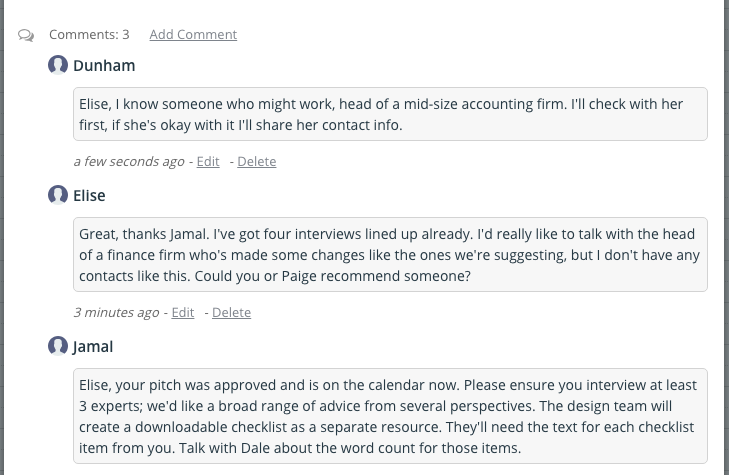
With event comments enabled, your entire content team can have discussions right on the editorial calendar event. There’s no need to take discussion to another messaging service or gather details and comments from an email thread.
Easily collaborate with guest contributors by sharing an event
If needed, you can even share an event, including event comments, with others who don’t have access to your calendar. This can be an easy, secure way to collaborate with guest contributors. Rather than allowing them calendar access, simply set comments to be visible to all users. Then share the event as a page with the guest contributor.
The event comments will be visible on the event page, and guest contributors can add their own comments to the discussion:

Add holidays, industry news, and other calendars with incoming calendar feeds
You can add an iCalendar feed for any calendars that influence your content planning. For example, a holiday calendar can help you stay on track with seasonal content planning. You can add inbound iCalendar feeds from other relevant calendars, such as industry news, events, conferences, and calendars for other organizational departments.
Grant customized access to your content team
Once you have the editorial calendar set up, you’re ready to share it with your team. Do so by going to Settings > Sharing, then creating a unique calendar link for each individual who needs calendar access.
For each calendar link, you choose which sub-calendar to include and you set the level of access permissions, as well. You can set one permission level for all sub-calendars, or you can set a different permission level for each sub-calendar.
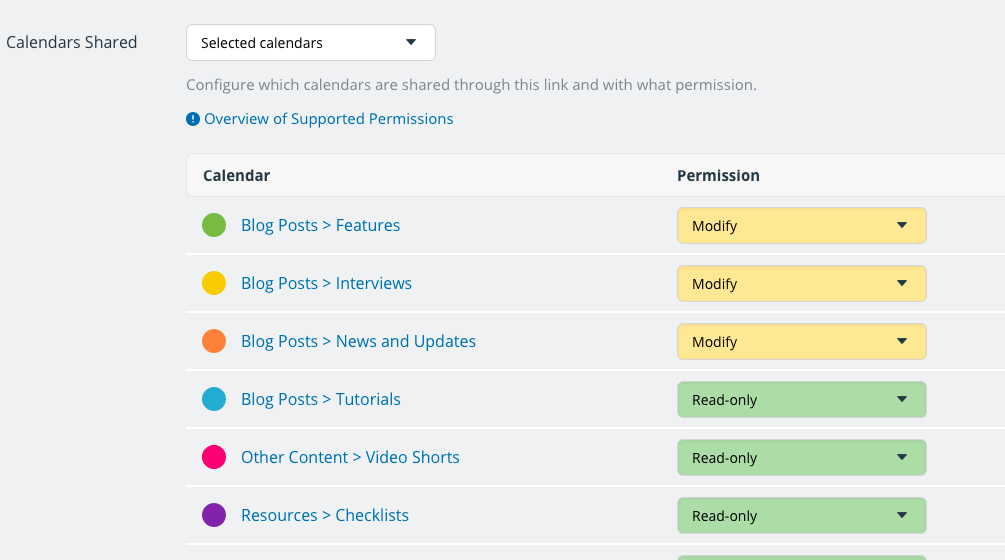
You can set read-only permission for a sub-calendar that someone needs to see, but not modify or add anything to. Then set other sub-calendars to modify or add-only.
Be sure not to share the calendar administrator link with anyone; the administrator link provides full access to all calendar settings. Create a daily-use calendar link for yourself, with full modify permissions for all sub-calendars, and keep your administrator link secure for use when you need to adjust the calendar settings.
Using your Teamup editorial calendar
Now you’re ready to start using the editorial calendar you’ve created.
Plan and schedule content
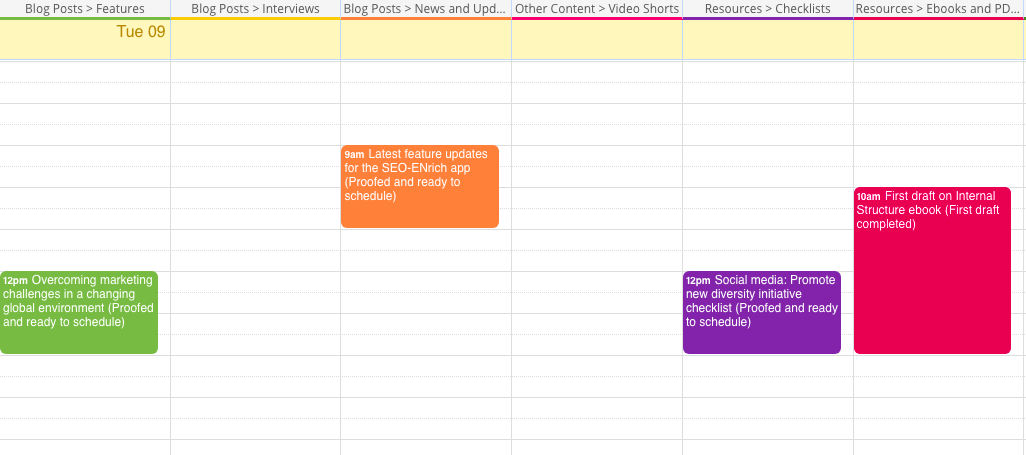
You’ll probably start by scheduling your most important types of content. You can easily switch between calendar views to see the big picture or to see more details. You can toggle sub-calendars on and off to focus on one type of content at at time. In the browser, you can drag and drop items from one date to another, if you need to adjust the publication schedule.
The Scheduler view is very helpful for comparing everything you have planned for a particular day:
Assign tasks and deadlines
Once you have content planned, you’ll assign the work to the team so everything is completed on schedule. You can do this by adding the content to the contributor’s sub-calendar:
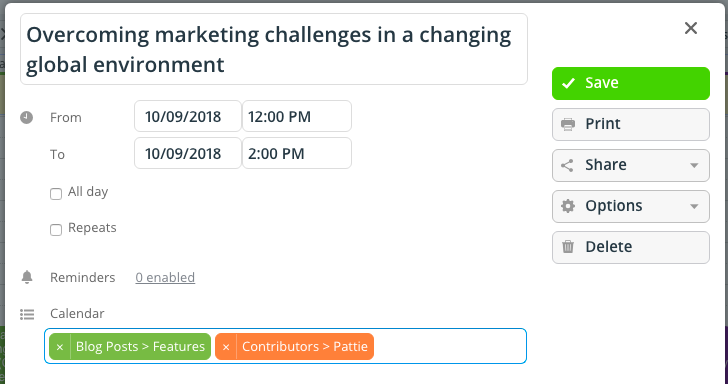
When a contributor completes their work, they can remove the event from their sub-calendar and assign it to the next contributor. Or, if you want to oversee those task transitions, you can have them add the event to your sub-calendar so you can check the work that’s been done, then assign it to the next team member.
Each team member involved can see what’s planned for the near future and what is currently in progress, plus what stage it’s in. Knowledge is power; the more contributors know, the more they can work autonomously and collaborate easily. Checking a shared calendar is much more efficient than messaging or emailing with status updates and questions: “Are you done with that graphic yet?” or “Have you finished the first draft for this piece?”
Teamup Calendar gives the power back to you with unique features that make sharing and collaborating easy. Customization is built-in, so you can set up and use an editorial calendar in a way that works best for you and your team. Whether you’re the sole contributing editor on a small content team, or the head of marketing for a major corporation, you can scale a Teamup Calendar to work for your content system and make content planning and production more efficient.
Questions? Let us know how we can help, or try out one of our live demos to see all the features in action.
Header photo by Phil Desforges on Unsplash.