
Create open times, share with clients and partners, and allow them to schedule their own appointments.
There are many situations that require individuals or groups to book varying time blocks. For simple booking situations, when you need to make a few spaces or time slots available to a limited number of clients, Teamup is a great tool.
Table of Contents
User stories and booking examples
Here are a few examples from our many happy users:
- A tennis club uses Teamup to allow members to book time on the tennis courts.
- A social gaming community uses Teamup so members can book times for coordinated game play within alliances.
- A car club uses Teamup to “manage bookings without any hassle or administration costs. Members just block out the times they want a car.”
In many cases, the booked times change from week to week, or even from day to day. Thus, recurring events are not a good solution for these situations. Having a single calendar administrator input all the booked times ends up becoming a lot of work for that person.
The ideal situation is to enable the individuals or groups to book their own time, as needed, on the calendar.
To do so, you need to have all these features:
- a shared calendar with an overview of all bookings.
- an easy way to allow multiple people to access the calendar for bookings.
- a simple way to show open/available time blocks that can be booked.
- a way to protect the calendar data that shouldn’t be shared or modified.
Teamup provides these needed features.
How to manage booking with Teamup
There are two primary ways you can manage booking with Teamup.
The sub-calendar method
One way to manage booking with a Teamup calendar is with designated sub-calendars. Here’s how you could set it up.
Let’s use a scenario for a consultancy that wants to offer appointment times to their clients.
First, you would add a new sub-calendar that shows the available appointment times. We’ll make it yellow.
Then you’ll add a sub-calendar that your clients can use to book their appointments. Make it disallow overlapping. This way, you can’t have accidental double-booking of a single time block. We’ll make this one pink.
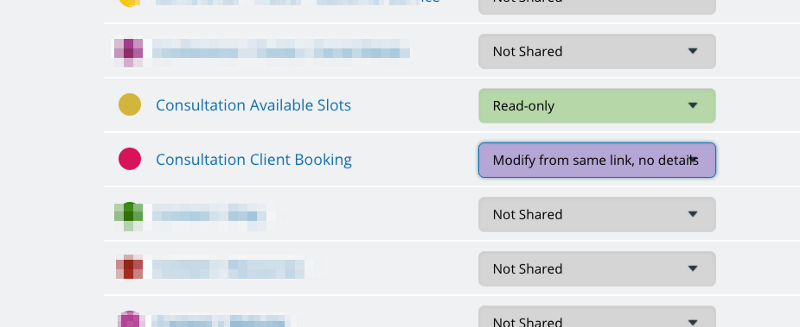
Next, create the calendar booking link. This customized link will be shared with your clients to allow them to book their own appointments. Set the permissions to be read-only for the available appointments calendar, and Add-only, no-details for the booking sub-calendar. If you have other sub-calendars, set them to “Not Shared” and they will not be visible to your clients.
With these permissions, each client can add and view their own appointments, but can’t view appointments made by others. They’ll merely see the space as reserved, if it’s already been booked by someone else.
- Note that if you are working with a small number of clients, you could create an individual calendar booking link for each client; in that case, set the permissions so that it is read-only for the available appointments calendar, and Modify-from-same-link no details for the booking sub-calendar.
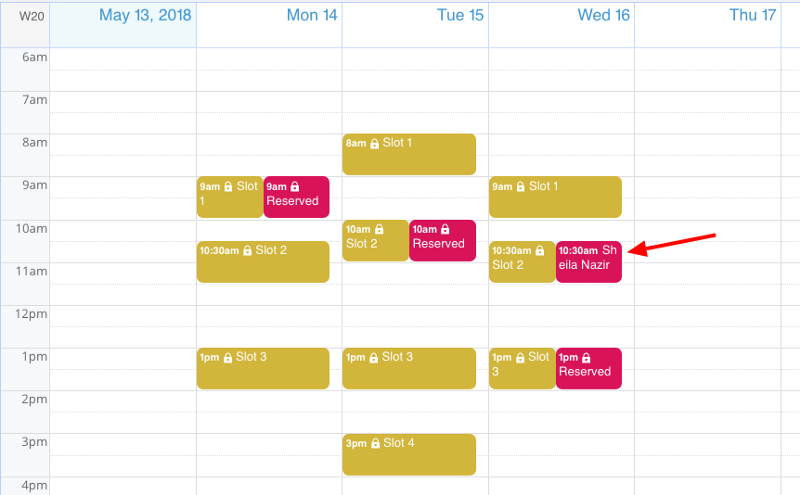
The calendar, with a few bookings on it, will look like this for you, with full permissions to see all details of the calendars:

To a client, the calendar will look like this:

When a client books a spot on the calendar, they’ll see the details of the booking they added:
Confirm a booking
The consultant or calendar admin can confirm a booked appointment. It’s helpful to subscribe to notifications to the sub-calendar used to book appointments; then you will receive an email notification (choose to receive a notification email for each event, or a daily summary email). From there, you can move the booked appointment to a Confirmed appointment calendar, if desired.
Then confirm with the client:
- To send the client a confirmation email or text, use the event sharing function on our mobile apps, or repeat later as a proactive reminder.
- It’s possible to tap the client’s phone number to initiate a call directly on the mobile app.
- When the client opens the event page URL, he or she will be able to save the appointment directly to their personal calendar.
The signup method
Another way to manage bookings is to use Teamup’s built-in signups feature. This method works well if you need to allow multiple participants for a single time slot.
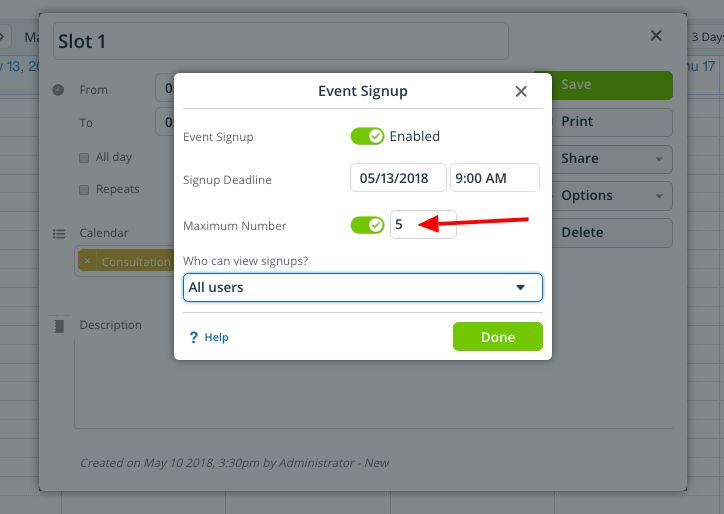
First, enable signups on the time slots you’ve created. You can set a deadline for signups. Set the maximum number of people you can allow for the time slot, as well, to avoid over-booking.
Next, create a calendar link to share the available time slots with clients. Set the permissions to read-only.
Now, a client can open the calendar with their link. They click on the time slot they want to book, and they’ll see a blue Signup button. When they click the button, they can add their name and email address to signup for the time slot.

To show if an event signup is open or full, you could create a custom field and display an emoji in the event title. See an illustration on Instagram.
When you enable signups, you can choose who sees the list of people who have signed up: anyone, or only users with modify permission. If you choose to only allow anyone to see who’s signed up, they’ll see a list of names on the event. The email addresses will be hidden automatically to protect privacy.
Here’s more information about using the Signup feature.
How could you use bookings to manage your spaces, appointments, clients, and employees? Get more ideas from our Wall of Love.