Last updated Apr 11, 2024
Every Teamup calendar has certain default event fields. Some of these built-in fields handle basic calendar information such as Who and Where. Others, such as Attachments, Signups, and Comments, add powerful functionality to your calendar. You can configure these default fields, customizing your calendar for the way you want to use it. Here are some great examples of using the default event fields on a Teamup Calendar.
Table of contents
- Use any text field for a clickable link
- Use event field labels as user prompts
- Make an event field more specific
- Let read-only users upload photos and notes
- Combine a custom field with default event fields
- Add location information without mapping
- Create a focused event view
- Share status updates with limited event details
1. Use any text field for a clickable link

On a Teamup Calendar, you can put an active link in any text event field and the link will become clickable. For example, a clickable link could be:
- A Zoom or Teams link for a virtual meeting
- The URL for a form, document, or other file stored in the cloud
- A webpage link
- A phone number: In the Teamup app, you can long press any phone number in a text field to call it.
You can add a custom text field to use for a link or phone number. But you can also use the default fields. Both the Who and Where fields are text fields; so you can repurpose one of these default text fields to contain a clickable link.
2. Use event field labels as user prompts
To help calendar users be consistent, change the field titles so they serve as reminders or prompts. Event field names can be up to 60 characters, enough to provide a brief instruction or key reminder.
For example, you want members of your hiking group to share descriptions of recent hikes or new trails, but you want them to keep the description short.
Edit the Description field’s title to serve as a prompt for group members:

When group members add a new hike to the calendar, they’ll have the cue right there:

3. Make an event field more specific

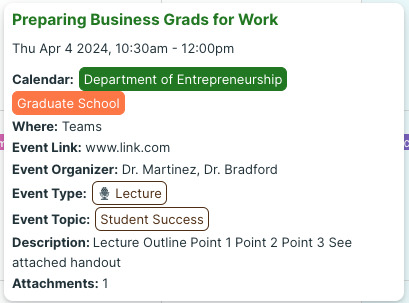
The event shown here has several custom fields. The “Event Organizer” field, however, is just the Who field, relabeled. Making it more specific gives calendar users a clue about how to use the field. They don’t have to guess whether the Who field is for the speaker or presenter, special guests, or organizers. The specific label makes it clear. You relabel any of the default event fields except for the Calendar and Title fields.
4. Let read-only users upload photos and notes
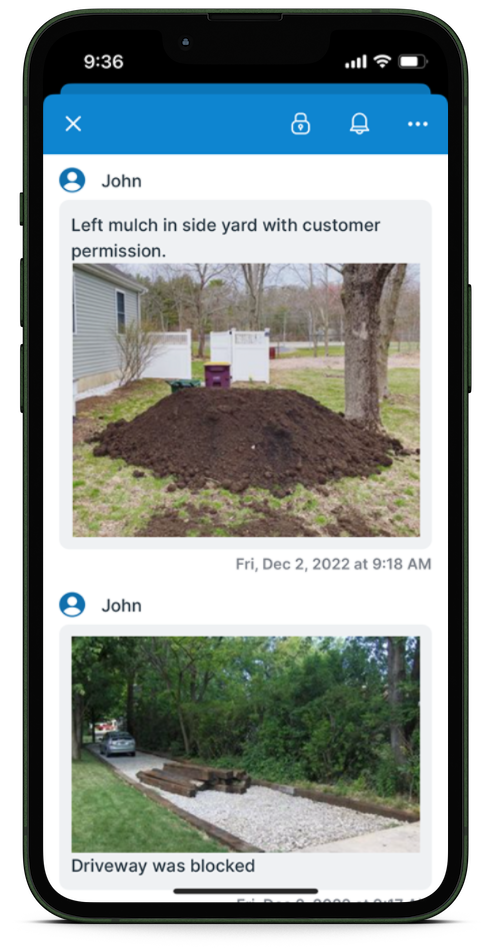
Calendar users who have read-only access to the calendar can’t modify any events. However, they can use event comments to make notes and upload photos. You can enable field crew, for example, to document their completed work without allowing them to change any other details of the events. All you need to do is configure the event comments to be visible to all users by default. Then read-only users can upload photos and make time-stamped notes using the comments.

5. Combine a custom field with default event fields
There’s one custom field included on the free (Basic) plan. You can use even a single custom field in a lot of useful ways, especially in combination with the default event fields. A few examples:
- Below the Where field, add a custom text field for parking information.
- Below the Who field, add a custom text field to capture a contact number or email address.
- Use the Who field to designate Team Lead, and a custom pre-populated user field to tag team members involved.
- Relabel the Who field to Project Name, and below it add a custom number field to capture the project’s estimated value, hours, or material cost.
- Use a custom choice field for predetermined options like Status or Grade. The event here has only one custom field (the Grade field); the rest are default fields, customized.

A custom choice field for Grade combined with the configured default event fields.
6. Add location information without mapping

Teamup’s Where field will automatically pull the map information for the location. Usually, that’s a helpful feature: anyone can tap the Show on map link to get directions to the event. However, some locations may be known to your event participants by the location name (rather than its exact address). Or perhaps the default mapping isn’t accurate, leading a back entrance or closed lot that will be confusing for guests. To handle this scenario, you can deactivate the map integration on the Where field:
Here’s a renamed Where field without map integration:

7. Create a focused event view

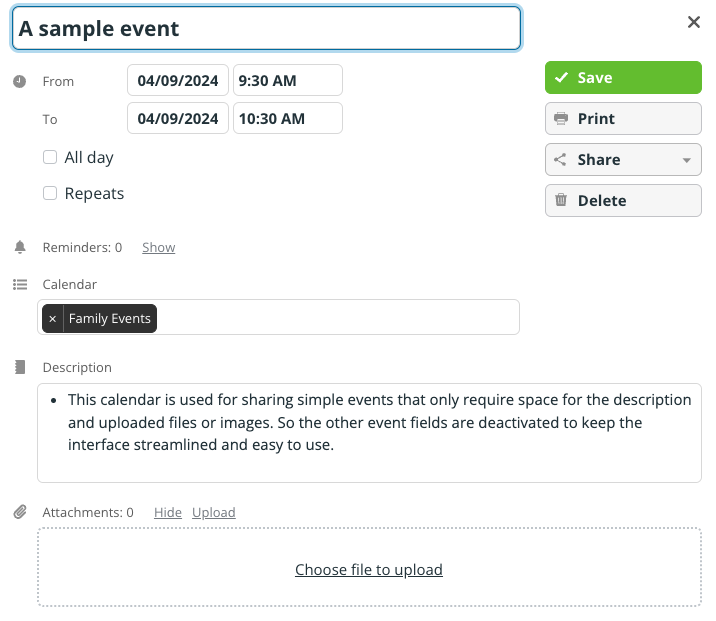
Deactivate any event fields you won’t use for streamlined events. Less clutter makes it easy to capture exactly the information you need.
If you need to keep event fields active but want a streamlined view at times, use Table view. You can hide any fields (each field is in its own column). You can then print from Table view for a customized task list or a report that includes only the visible columns.
8. Share status updates with limited event details
You might want to share some event information, like a job status or project update with customers. But you don’t want to share all the event details. Here’s a workable solution using two separate Teamup calendars, an iCalendar feed, and some smart configuration. The key is deactivating certain event fields on the “Customer View” calendar.
Everyone has different needs, priorities, and work styles. One of the best things about using Teamup: you can customize so much to make it truly yours. Explore the features and options, and configure these built-in fields on your Teamup Calendar to make things easier, more efficient, and more enjoyable. If you don’t have a Teamup Calendar, create one today.


