
Many companies and organizations use Teamup. It’s helpful for managing everything from staff scheduling to appointment booking to corporate events and tradeshows. But that’s only one side of Teamup: many of our users take advantage of the powerful features and built-in flexibility to get their personal life organized. Best of all, with our basic plan, you get a fully functional calendar for free.
A Quick Look at How Teamup Works
At a first glance, a Teamup Calendar may look the same as Google Calendar or Outlook. Don’t be fooled, though. Teamup is no ordinary calendar.
- Designed for sharing. You can use Teamup to manage your own schedule, and it also enables you to easily share your schedule with anyone else. Coordinating any detail of your life–from the menu plan to who’s picking up the kids from school–becomes easier with a calendar designed for sharing.
- It’s easy to use. You don’t have to create a user accounts or get anyone else to login to share your calendar. All you need to access a Teamup Calendar is a calendar link. When you create a Teamup calendar, you’ll get the administrator link, which gives you full access to your calendar and all its settings. From your calendar settings, you can create more calendar links for sharing. You set permissions for each calendar link to provide the customized calendar view and access you want it to have.
Check out the demo calendar view below; the numbered elements highlight some of Teamup’s unique features.

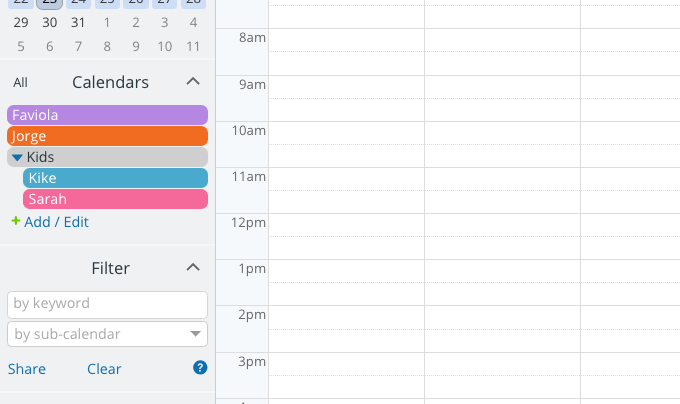
1. Organize with colors: Use color-coded sub-calendars make it easy to organize people, projects, school schedules, and more. A sub-calendar can be assigned to a member of your family, household chores, special events, or anything else you need to manage. Learn how to add color-coded calendars.
2. Schedule and view: With Teamup, you can add or edit events in many ways. Mobile apps for both iOS and Android keep you updated anywhere. And there are plenty of options with events: plan recurring events, drag-and-drop to change event times or dates, use multiple calendar views, and include as many notes and details as needed on each event. All updates are instantly available to all users across all devices, any time, anywhere.
3. Share easily: Sharing a Teamup Calendar is as simple as sharing a link. You can create as many calendar links as needed, and each one can be customized. That means you can share all of your sub-calendars, or only some of them. You can set permissions, too; for example, give read-only permission to allow someone to see your calendar but not change it or add to it. There are 9 levels of permissions to choose from.
4. Manage access: A user is identified by the name of the link used to access the calendar. Changes are tracked in the edit history or via change notifications. As the calendar administrator, you can manage the calendar links easily and create as many links as needed for any number of users.
Now that you have an idea of what Teamup can do, let’s look at how you can use it to manage your schedule, your household, your exercise schedule, your personal projects, travel, family, hobbies, and more.
Use Teamup to Get Your Personal Life Organized
You can keep things very simple or create a calendar set-up with more detailed organization.
1: Create your Teamup master calendar
Creating your free Teamup calendar is as easy as filling out this simple form. You’ll provide a name for your calendar, your email address, then choose your default language and time zone (these can be changed later, if needed). That’s it! Hit the Create Calendar button and you’ll be taken to a page with your new administrator link. Click the link to open your new calendar.
(A copy of the link will also be emailed to the email address you provided. Keep that email saved for reference in case you misplace your administrator link.)
2: Set up your sub-calendars.
The free plan includes up to 8 sub-calendars. You can use these sub-calendars however you want.
Here are a few ideas:
- Create a sub-calendar for shared events and one for personal tasks and activities.
- Create a sub-calendar for each member of the family. (Here’s an example.)
- Create sub-calendars for each main area of your personal life: home, relationships, hobbies, etc.
- Create sub-calendars for the goals or habits you’re working to achieve.
Creating sub-calendars is easy: go to Settings > Calendars. Use the blue button in the top right to create a new calendar.
All of your active sub-calendars will appear on the left sidebar in your calendar:
Here’s more information about working with sub-calendars.
3: Create calendar links for sharing.
Once you have the sub-calendars set up the way you want, you can create unique calendar links for sharing your calendar with others.
The wonderful thing about calendar links is how customizable they are. You can choose which sub-calendars to include in each link, and set permissions for each sub-calendar.
Here are a few examples:
- Susan has five sub-calendars: one each for her and the two kids, one for her marathon training schedule, and one for writing contests she wants to enter. She creates a link for her wife that includes Susan’s sub-calendar with read-only permission, and the kids’ calendars with modify permission. Susan doesn’t include her marathon training or writing contest sub-calendars on the link. When her wife accesses the calendar via the link, only the included sub-calendars will be visible.
- Jorge and Faviola share cooking duties, but he wants to have a better menu plan so they don’t end up with so many repeats. He creates three sub-calendars: Jorge’s Menu, Faviola’s Menu, and Menu Ideas. He then creates a link for Faviola which gives her read-only access to Jorge’s Menu sub-calendar, and full modify permission for the other two sub-calendars.
- Lise, Patrick, and Zahid are roommates. Patrick’s tired of nagging everybody to share the chores, so he creates a sub-calendar for “Household Chores.” He has other sub-calendars for his own schedule, but he doesn’t need to share these. He creates a link that only includes the Household Chores sub-calendar, sets the permission to add-only, so no one can accidentally delete a chore someone else has added, and shares it with Lise and Zahid.
- Greg and Karin share custody of their child. Arranging the pick-ups and drop-offs is a hassle, especially when there’s a change in the school calendar or when Karin has to travel for work. Karin sets up three sub-calendars: one for her work and travel schedule, one for Greg’s work schedule, for the school schedule, and one for their child’s other activities. She shares all four with Greg, giving him modify permission for all but her work/travel schedule. Greg inputs his own work schedule and together they keep the sub-calendar for school and other activities updated.
The different types of access permissions give you complete control over how you share your calendar. None of us live in a vacuum; we need to be able to collaborate with the important people in our lives. Doing so with back-and-forth emails and text messages is a pin, though; and then, once you’ve figured out the schedule, you still have to get it on your calendar. Teamup removes the entire back-and-forth part of the process by giving you a way to share your calendar without losing control of it
To create a unique calendar link, go to Settings > Sharing. Use the blue button in the top right to create a new link. Scroll to the bottom to choose the sub-calendars you want to include, and set permissions for each one.
Here’s more information about working with calendar links.
4: Set up the Teamup mobile app.
Teamup has mobile apps for both Android and iOS. With the mobile apps, you can easily update and view your calendar on your phone.
To set up the mobile app, first have your calendar link ready. Download the app (for iOS or for Android). Then launch the app and do one of the following:
- Paste in your calendar link to load your calendar in the app, OR
- Tap the demo calendar key for a quick test drive. When you are ready to add your own calendar, go to the Dashboard and add your calendar link.
5: Share calendar links and stay organized.
Once you create the calendar links to share, all you have to do is send it to the appropriate person. No one needs to login or register; all they have to do is paste the link into their browser. Or they can follow the steps above to use the mobile apps with their own calendar link.
If you need to updated a calendar link, to add or remove a sub-calendar or change permissions, you can access the links from Settings > Sharing, and change them as needed.
There are a few other features that will help you keep your personal life organized and make the most of Teamup:
-
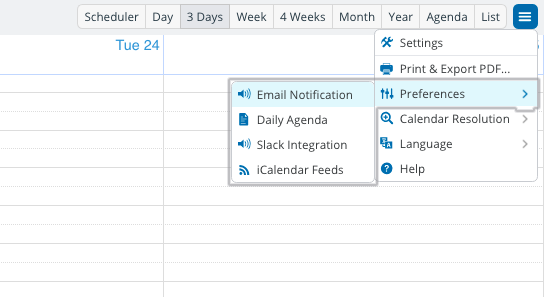
Notifications
To subscribe to Notifications, click the blue menu icon in the top right of the calendar, then select Preferences > Email Notifications:
You can choose to be notified of all changes to the calendar, or changes to only selected sub-calendars, or only certain types of changes. You can also choose to have an immediate notification for each change, or you can choose to have a daily summary of changes.
-
Event comments
If you need to discuss things like transportation arrangements or timing or other details, event comments can be very helpful.
To enable the event comments (by default, for all events), go to Settings > Event Fields, then click the Edit button on Comments. Then check the box to enable comments by default:
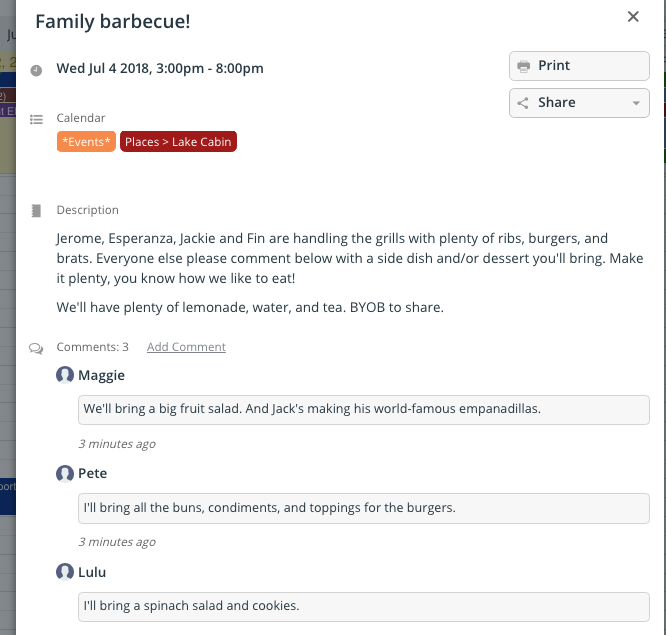
Now each new event created will have Comments included, which you can use to discuss details of the schedule, right on the calendar. That prevents the need to go back to email or texting to work out details. By using event comments, all the discussion takes place right on the calendar. It’s streamlined, and provides a record of what’s been decided; you can see all the discussion when you open the event, rather than having to sift through old messages to remember who’s supposed to do what.
Here’s more information about event comments.
-
Event signups
If you are coordinating an event, or want to delegate tasks, you can use event signups.
To add signups to an event, go to the event editor, then click on Options, then Signups.
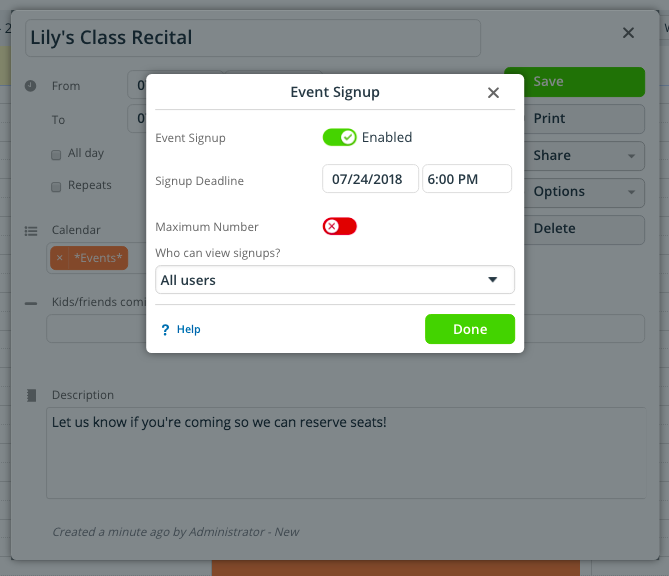
Enable Signups and choose the options you want: you can set a maximum number of signups, for example. Save the event. Now when it is opened, there will be a Signup button.
Here’s more information about using event signups.
-
Share event as webpage
With a click, you can create a stand-alone webpage for any event on your calendar. It’s easy and automatic. Then all you have to do is share the link to that webpage, and anyone can see the details of the event.
To share an event as a webpage, click on the event to open the event editor. Then choose Share > As Page. Teamup will automatically create and open a webpage with all the event information on it:
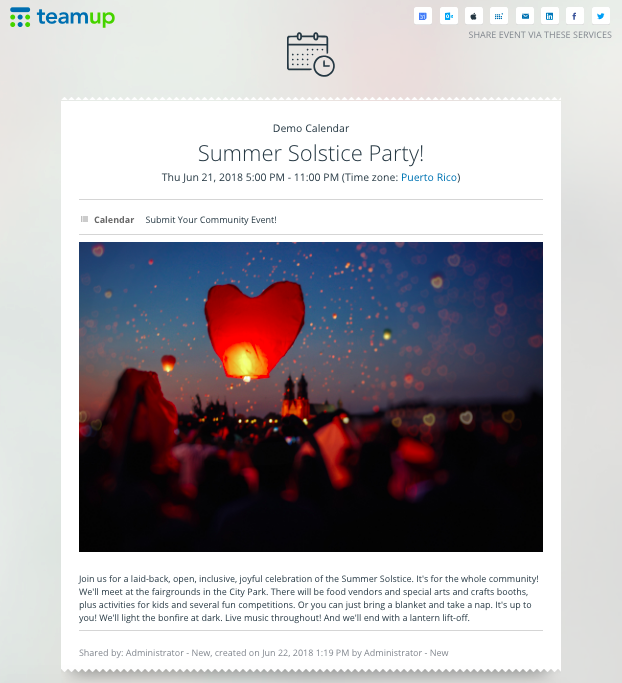
If you have comments and/or signups enabled for “All users,” then anyone with the link can add a comment or signup. This is a fast and easy way to share an event invitation to a larger group, or to send out an information on a one-time event when you don’t necessarily want to share a link to your entire calendar.
Here’s more information on sharing an event as a webpage.
There are many more possibilities and ways to keep your personal life organized with Teamup. Why not give it a try? Click here to create your new, free calendar.
Header photo by Daria Shevtsova on Unsplash.